Instructions for viewing stereograms in 3-D |
Instructions for viewing stereograms in 3-D |
| Would you like to see drawings
like the following in my astronomy pages
in three dimensions?
The above is called a “stereogram”. If want to see it in three dimensions, using only your bare eyes, please follow these instructions.
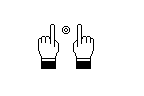
Select a spot on the opposite wall: it could be the door knob — or anything at a distance of more than 2 m. (7 ft.). Place your two index fingers at arm’s length as shown in the figure above, while watching the door knob between your two fingers. If you are focusing on the door knob, then you actually see four fingers!
If you don’t believe me, shake your fingers slightly (but always focusing on the door knob), so their four moving images will become apparent. Don’t focus on them! The trick is to be aware of all four fingers while still focusing on the door knob. If you feel your eyes becoming de-focused from the door knob whenever you move your fingers, have patience! The experiment will not work if you cannot pass this first step. Are you in a position to “see” four index fingers while focusing at a distance? (There is nothing wrong with your eyes: this is the way our visual system works to perceive depth, i.e., the 3rd dimension.) Now move your fingers inwards slowly (see figure below), until the two innermost of the four index fingers merge into one.
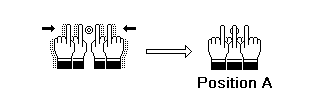
Remember, keep focusing on the door knob while you do the above! I admit this is a bit difficult to do since your index fingers will get in the way, but nothing prevents you from repeating this movement as many times as needed. Practice doing this. If it helps, before you merge your two index fingers, move your hands a little below the door knob, so that it remains at your focusing point all the time, then merge your index fingers (below the door knob), and finally move both hands slightly upwards until the tips of the two index fingers cover the door knob. If you have successfully merged your two index fingers you are effectively seeing three fingers now (shake them a bit to see them better), while you never de-focused from the door knob. We will need to refer to this position, so let’s call it “Position A”. Now the following action is the key to our experiment. Since you still focus at a distance, slowly de-focus (without moving your hands) and look (focus) straight on one of the two fingers (or in the space between). No other part of your body must move, except your eyes! Do the de-focusing slowly, feeling how your eye muscles move while you change focus from door to fingers. This is important, I am not joking. It is important because now I will ask you to do the reverse movement! Try to bring your two index fingers back to Position A (as they were before you de-focused) without moving your fingers, just your eyes. Can’t do it? Don’t be discouraged. And read on, you are very close to completing the job. I assume you had some difficulty in doing the reverse movement (merging your two index fingers without moving them). So here is what to do. Go back to Position A, and this time do the de-focusing in a very careful and controlled way: do not de-focus all the way, but only a little, hesitating, and going back to Position A immediately. Do this several times, seeing your fingers becoming separated and merged again. As you become more confident, gradually increase the separation distance between your fingers, and do the merging and un-merging again. (Remember, no other part of your body moves during the merging/un-merging save for your eyes.) As you become more and more familiar with this movement you will find yourself being able to separate the two fingers all the way, and bring them back to the merged position (Position A) at will. You have essentially learned to control your eye muscles. Don’t worry, there is no problem of getting in some kind of eye-strain trouble because of muscle contortions: you don’t contort anything; this is the natural position of your eyes when you focus at a distance. (Except that usually there are no other objects — such as fingers — in front, so you’ve probably haven’t noticed it.) Moving your eyes at will so that they come to Position A is all this text is attempting to teach you. Why is this sufficient? Because if you can merge your two index fingers at will, you can also merge the two almost-identical-but-not-quite parts of a three dimensional figure, such as in the one below.
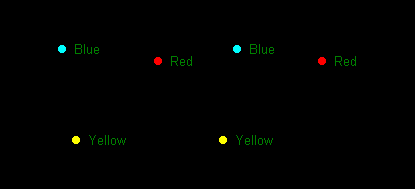
Just pretend the two repeated parts of the image (left-half and right-half) are your index fingers, and do the same thing. You will know when you manage to merge them, because you will see the yellow ball standing out in front of the page, while the red one stands in the middle, and the blue one stays in the background! You may find it easier to do the merging if you position yourself at some distance from the screen (e.g. at 1/2 meter, or 1.5 feet). Isn’t this much better than red-and-blue glasses to see in 3D? (Such glasses eliminate the colors, by the way.) The 3D images that you saw in my astronomy pages are more demanding, since the separation is greater, but with enough practice you will soon be able to see them properly in 3D. Good luck! The author.
|